Microsoft
Integrating ID Dataweb with Microsoft (Entra ID / Azure AD).
Overview
ID Dataweb integrates directly with Microsoft Entra Verified ID to act as both verifier and issuer of the decentralized credential. When an organization is issuing extremely valuable credentials, it is essential to ensure that they are giving it to the right person. ID Datweb verifies that the digital user is the real life user that is expected and adds confidence to this verified credential.
Prerequisites
Microsoft Entra side:
- Microsoft Entra tenant
- Verified ID enabled
- Access to Microsoft Entra Admin Center
ID Dataweb side:
- Active ID Dataweb account
- Completed onboarding with ID Dataweb
- Issuance or verification URL provided by ID Dataweb
Shared requirements:
- Credential type selected during Verified ID configuration
Configuration Steps
Step 1.
As a developer you need to share the steps in this section with your tenant administrator. These instructions help them get the verification request URL, and application body or website to request verifiable credentials from your users.
Note:
Make sure this is the tenant you set up for Verified ID per the pre-requisites.
- Go to Quickstart-> Verification Request -> Start.
- Select on Select Issuer.
- Look for ID Dataweb in the Search/select issuers drop-down.
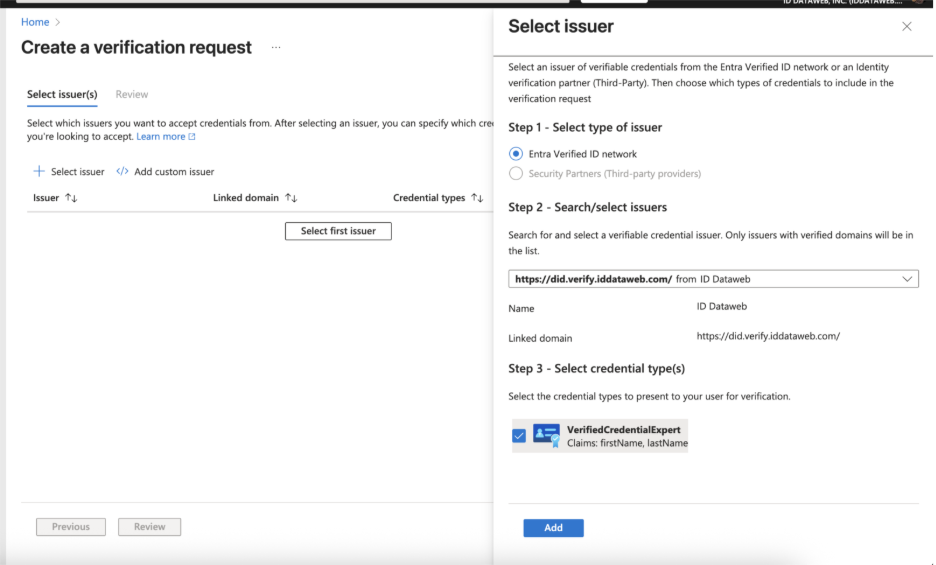
- Check the credential type you discussed with ID Dataweb for your specific needs.
- Choose Add and then choose Review.
- Download the request body and copy/paste POST API request URL.
Step 2.
As a developer you now have the request URL and body from your tenant admin, follow these steps to update your application or website:
- To request Verified IDs from your users, include the request URL and body in your application or website.
Note:
If you are using one of the sample apps, you'll need to replace the contents of the presentation_request_config.json with the request body obtained in step 1. The sample code overwrites the trustedIssuers values with IssuerAuthority value from appsettings.json. Copy the trustedIssuers value from the payload to IssuerAuthority in appsettings.json file.
- Replace the values for the URL, state, and api-key with your respective values.
- Grant your app permissions to obtain an access token for the Verified ID service request service principal.
Testing
User flow is specific to your application or website. However if you are using one of the sample apps follow the steps here - Run the test the sample app
Please view the video below for a demonstration of the user experience.
Troubleshooting
- Incorrect or missing Request URL
Issue
Verification request does not execute
QR code or deep link not generated
Resolution
Copy the Request URL directly from Microsoft Entra Verified ID
Ensure the exact URL is used in the application without modification
Confirm the application is calling the correct endpoint
- Incorrect or incomplete Request Body (JSON)
Issue
Verification request fails or does not return expected result
Resolution
Replace the full request body with the JSON generated in Entra
Do not modify fields unless required
Ensure the JSON is properly formatted and complete
Updated 2 months ago