API Integration of Session Risk Verification
This document covers everything you need to know for your AXN Verify - Risk Analysis Integration.
Prerequisites
- AXN Manage test application
- AXN Manage Postman project with your credentials prefilled
Process
- It is recommended you use the test application and postman project to test and understand the functionality first. For this - follow the instructions below.
- Take the javascript from the test application, and put it onto the appropriate page on your application. Typically this is the "account opening" page.
- Integrate the API per the postman project / documentation below. The API is typically called when the user attempts to create an account. If this is part of a multi-step risk analysis process, please ensure you are sending the credential and transaction ID (ASI) in on subsequent steps, as outlined here Tracking Credential and Session across Multiple API Calls
Test Application
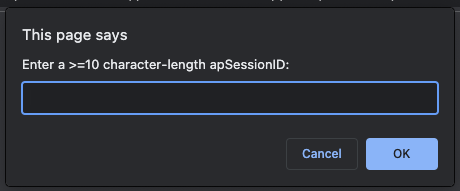
- Open the test application. You will see the following:

- This gives you the opportunity to put in a session ID. Enter a random string above 10 characters. Note - in your actual implementation, your javascript should create the unique ID, or you can use a different unique session identifier (if one already exists in your application.)
- once you enter a value, you will see:

- The profiling of your device is now complete. Next, you'll use the Postman project to retrieve the results.
Postman Project
- Open the postman project. Here - you will see all API calls required for AXN Manage, including optional MFA API calls.
- First, get an access token from the first API call in the collection.

- Next, copy this access token, and add it as the header to the next API request.

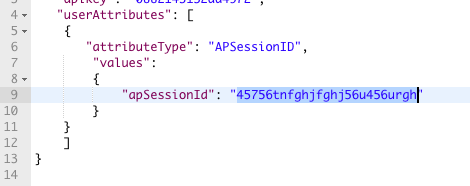
- Lastly, grab the "session ID" from your test application, and add it to the body of the request:

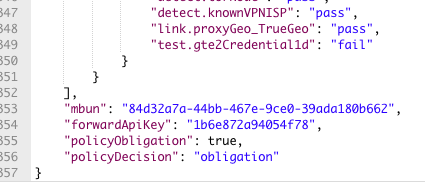
- Your API request is now ready to submit. Click "Send". Within milliseconds, you'll see the result return. If you scroll to the bottom, you'll see the
policyDecisionfield, which indicates the result.

Understanding the results
- The results of this API call provide the full risk score for your device.
- Description of the high level fields: /slverify output
- Description of specific tests run: ThreatMetrix
- How to use the policyDecision field in your application: Policy Decision in /slverify
Integrating into your application
- Pull the javascript from the test application, and insert it into your application. Make sure the device profiling successfully begins on your page. To check this, open the network tab when you load your page. You should see many HTTP requests firing - this is evidence that it is working correcty.
- Integrate the API calls into your server side logic. The API calls should be made based on the user completing the form. For example - if they are filling out a registration form, have the "submit" button on your UI trigger the API calls to ID DataWeb.
- Parse the results from the API, and handle accordingly.
- If this is a 1 time risk check, your API should be set up with APPROVE or DENY. Approve means there was no risk detected. DENY means there was risk, and the user should not proceed. Handle this logic accordingly in your application.
- If this is a risk check which leads into other steps (identity verification) - you will likely see that "obligation" is returned for low risk users, and DENY is returned for high risk users. If OBLIGATION is returned, this means that the user can proceed to the next step (whatever that may be in your use case.) Your solutions architect will provide contextualized details of how this works for your use case.
Updated 5 months ago
