Policy Decisions
The Decision Engine is a policy management solution which allows customers to specify which users should be approved due to trust, denied due to risk, or stepped up to another challenge.
Accessing the Decision Engine
You can access the Decision Engine UI from the Verification Services Configuration page for any step in your verification workflow.
Steps:
Starting at the Workflow page:
- Click on a Workflow, and select "Manage Services"
- For a specific service in the list, click the menu icon, and select "create modify change request"
- Select the Policies Tab
- Ensure that the "Decision Engine" option is selected
- Click "Details"
You now have access to edit your Policy Decision.
Sections of the Decision Engine
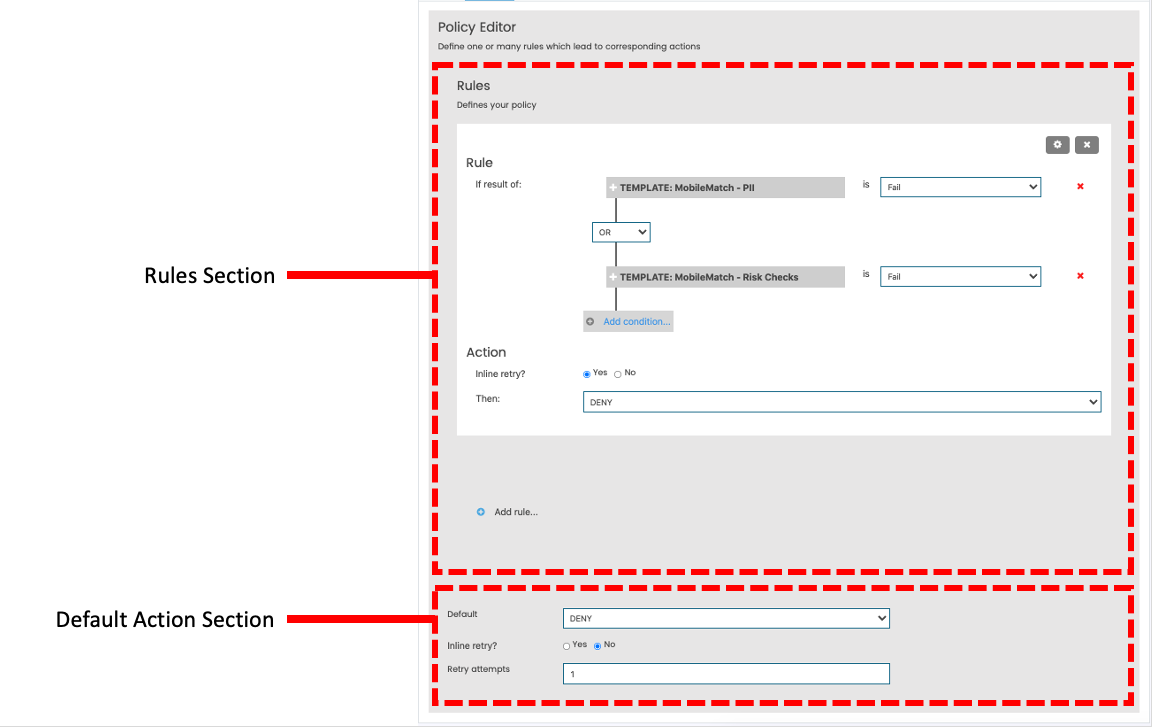
The Decision Engine UI has two main sections:
- Rules: Define one or many rules for your policy.
- Default Action: Define what happens if none of the rules are met.

The Decision Engine is made up of two sections - Rules, and Default Action.
Rules Section
The rules section is where you define one or many rules. A rule is one or many logical tests (conditions) which lead to a desired outcome (action.)
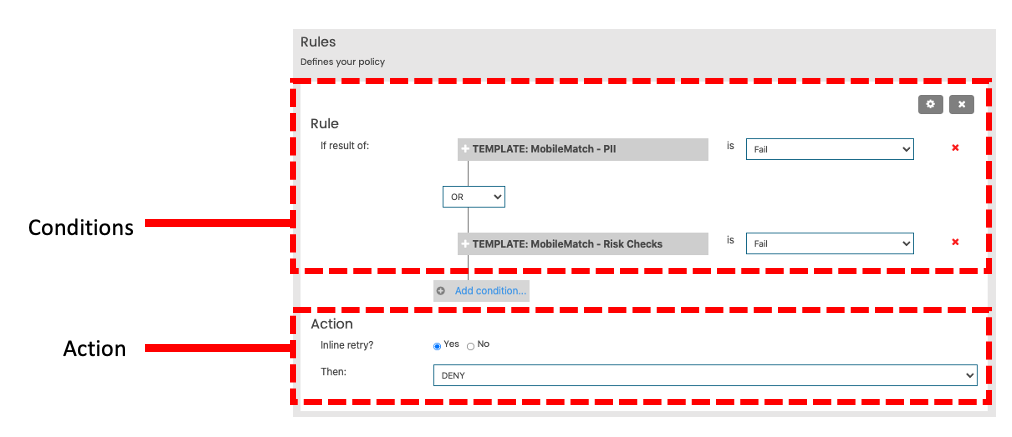
Each rule has:
- One or Many Conditions. A condition sets a logical test for an attribute, policy component, or assertion.
- In a given rule, conditions can be linked via an
ANDor anORoperator. This allows you to consider multiple conditions as part of the same rule.
- In a given rule, conditions can be linked via an
- One Action. This specifies the next step in the workflow if this rule is met, and handles the number of permitted retries. An action may be set to the following:
- APPROVE - end the flow, and return "Approve"
- DENY - end the workflow, and return "Deny"
- OBLIGATION - "step up" to an additional verification service. For this option, you must also choose the service which you'd like to proceed to next.

A rule is made up of two sections - Conditions and Action.
Adding Conditions to a Rule
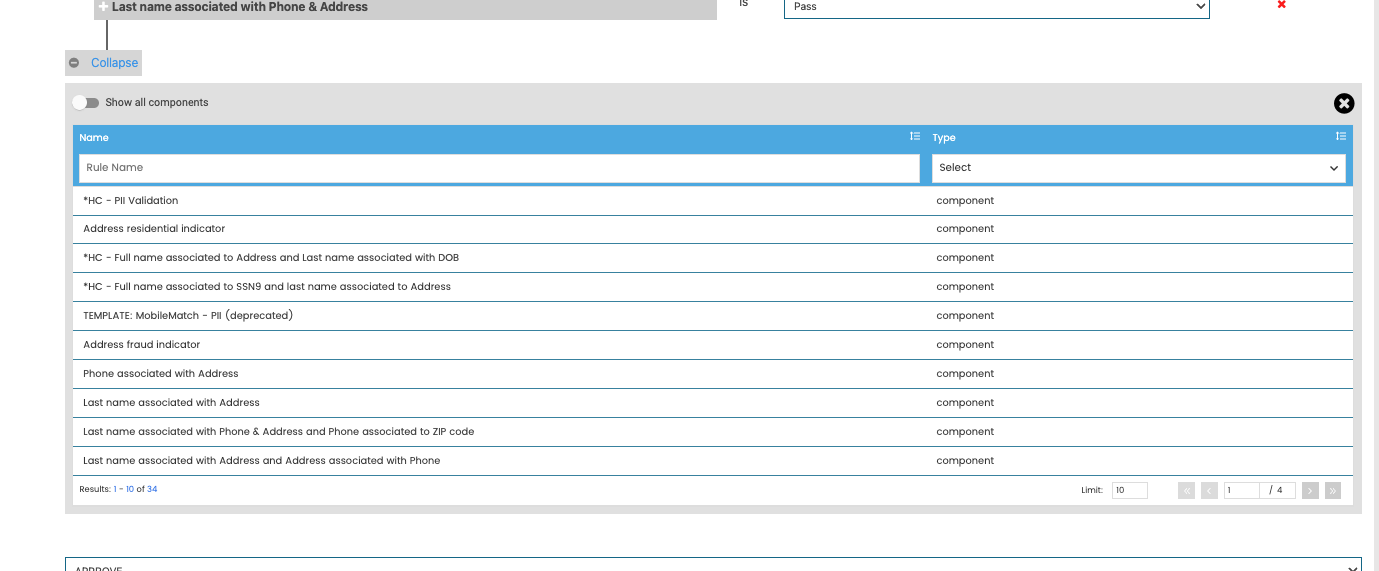
To add a condition, click the "Add Condition" button in the conditions section. This will bring up the Component browser.

Click "Add condition" to bring up the component browser.
The Component Browser will include all available Policy Components and Attributes which are available to your service, based on your Attribute Providers, User input attributes, and Assertions. For example - the system will not show a BioGovID related component if the verification service is MobileMatch.
You can search and filter the component browser to see what is available in this service. When you find the component you are looking for, simply click it to add to the Rule. You can then finish the Condition by setting the "PASS" or "FAIL" outcome.
Considering Multiple Conditions in a Rule
You can consider multiple conditions in a single rule. To do this, you must choose if the Rule is of an "AND" or "OR" type.
- An AND type should be chosen if ALL conditions must be met to proceed to the Action.
- An OR type should be chosen if ANY condition can be met to proceed to the Action.
Retries in Actions
You can specify if a user should receive a retry attempt in your rule.
The system will show the "Retry" option for a rule when a negative disposition is detected.
A negative disposition is detected when:
- one or more conditions are set to a "fail" outcome AND
- the action is set to either Deny or Obligation.

A rule with a negative disposition will show the retry option.
If you set "Retry" to "Yes", you can set the number of attempts at the bottom of the page by the Default Action.
Using Multiple Rules
Additional rules should be added to handle different desired outcomes. Rules are automatically associated with one another through an "OR" condition, which allows you to set up multiple rules without issue. For example - if you have a certain set of conditions which should lead to APPROVE, and another set which would lead to OBLIGATION, you should handle these with 2 separate rules.
Here is an example of setting up a new rule to send a different decision to a different Action:
Example Rules
This section illustrates the above concepts with some examples.
An example of a rule with a single condition:
- Rule: If 'MobileMatch PII' is
PASS - Action: Approve the user.
An example of a rule with multiple conditions:
- Rule: If 'MobileMatch PII' is
PASSANDSSN associated with Full Name" isPASS` - Action: approve the user.
An example of a rule with a negative disposition and retry enabled:
- Rule: If 'MobileMatch PII' is
FAILANDSSN associated with Full Name" isFAIL` - Action: Retry: TRUE, OBLIGATION to BioGovID
An example of 2 rules leading to different actions:
-
Rule: If 'MobileMatch PII' is
PASSANDSSN associated with Full Name" isPASS` -
Action: approve the user.
-
Rule: If 'MobileMatch PII' is
FAILANDSSN associated with Full Name" isFAIL` -
Action: Retry: TRUE, OBLIGATION to BioGovID
Default Action section
- The Default Action section gets triggered if a transaction's results are not handled by a rule.
- If you have NO rules defined, then the default action will be triggered for all transactions.
- If you have one or many rules defined, but a transaction's results are not handled by them, then the transaction would be handled by the Default Action.

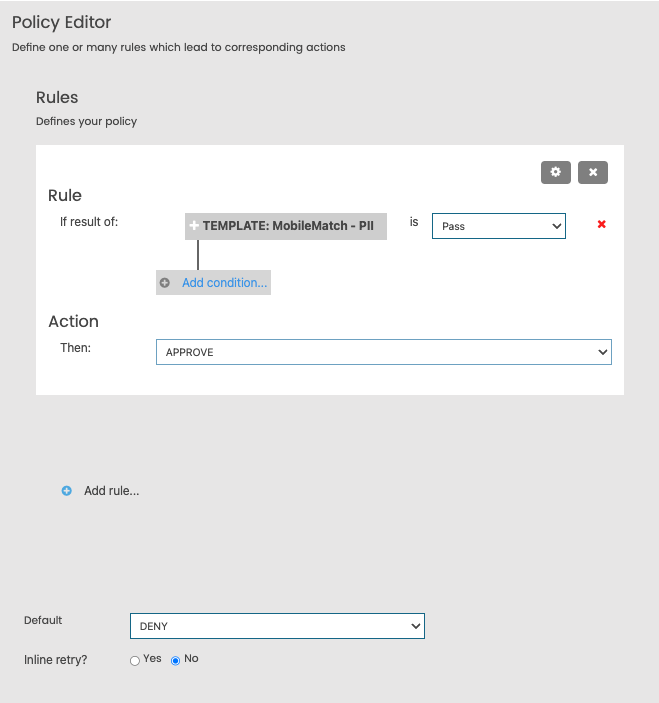
As an example, consider the following Decision Engine configuration:
Configuration:

Outcomes:
- If the user passes Mobilematch, they are approved. This is because they met the conditions of the defined rule, which led to the Action of "approve".
- If the user fails MobileMatch, the system will recognize this as an unhandled condition, thus the Default Action would be triggered. In this case, this would lead to the user being denied.
Best practiceIf you have a Step in your workflow which serves to educate the user only, consider having NO rules, and only a default action of Obligation to the next desired step in the process.
Retries in Default Action
If your Default Action is set to Deny or Obligation, you can specify if you'd like to have a retry enabled, and also the number of retries required.
Updated 8 months ago
