Gateway Overview
AXN Gateway is built on top of the OpenIDConnect (OIDC) authentication protocol.
Use AXN Gateway to verify user identity, without the hassle of implementing a user interface yourself.
What's OIDC?
OpenID Connect (OIDC) is an open authentication protocol that works on top of the OAuth 2.0 framework. Targeted toward consumers, OIDC allows individuals to use single sign-on (SSO) to access relying party sites using OpenID Providers (OPs), such as an email provider or social network, to authenticate their identities.
In a nutshell, OIDC's purpose is to grant another application permission to do stuff.
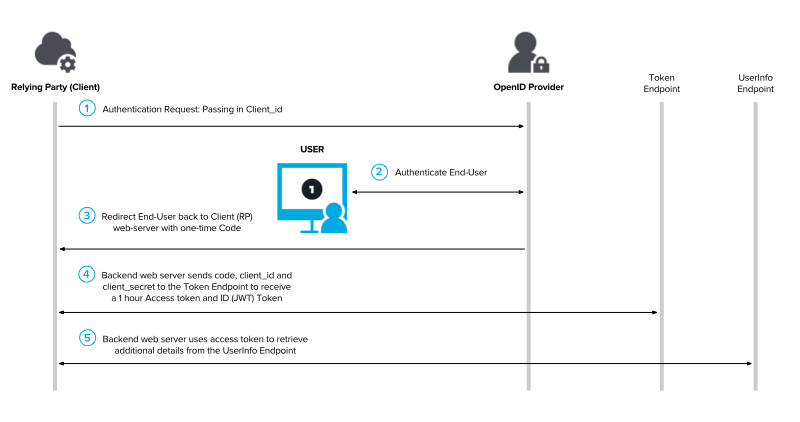
Here's how it looks:

1. Authorize
(GET) https://preprod1.iddataweb.com/preprod-axn/axn/oauth2/authorize
The relying party (yourself) makes an OpenID Connect request to our /authorize endpoint, including the client ID of the verification workflow you want to use, and other key elements (described below).
This browser redirect can be triggered from your own application, or any one of the many SSO integrations and identity systems available today.
Example
const redirect = () => {
    window.location.href = (
      `https://preprod1.iddataweb.com/axn/oauth2/authorize?` +
      `response_type=code&` +
      `scope=openid&` +
      `client_id=${'your-service-api-key'}&` +
      `redirect_uri=${'your-redirect-uri'}&` +
      `state=foobar`
    )
}
Understanding the request
https://preprod1.iddataweb.com/axn/oauth2/authorize
The base endpoint.
response_type=code
Defines that the response we want to receive is an Authorization Code (explained later on).
scope=openid
Defines the scope (or permissions) this request should have. In this case, we're only requesting openid, which will allow us to receive ID tokens, in addition to others (refresh, access tokens).
client_id=<your-service-api-key>
Defines verification workflow Gateway will use (e.g. MobileMatch, BioGovID).
state=foobar
State is a spec a part of OIDC. State ensures that the initial request, and its callback, are related. It's optional, but adds an extra layer of security. It should be random (UUID), and can be generated however you see fit.
redirect_uri=<your-redirect-uri>
Your redirect URI is where your Authorization Code will be sent once the user has completed the verification workflow. Exchanging this code for a JSON Web Token (later on) is how you'll retrieve the user's results.
2. Identity Verification
Once redirected, the user will begin the identity verification process.
This verification process is configured by you, the customer administrator, and is called a Verification Workflow.
Depending on your configuration, the user may go through one or many steps to complete the process.
For example:
MobileMatch. Where a user submits their phone number to receive and then verify a one-time-passcode.
Or
KBA. Where after a user submits their personal information, they're asked a series of questions (curated from the personal info provided) to confirm if they are who they claim to be.
3. Authorization Code
Once the user has completed the workflow, ID DataWeb will redirect the user back to the redirect URI specified in the initial request, along with a one-time pin, known as an Authorization Code.
https://client.example.org/redirect?state=...&code=SplxlOBeZQQYbYS6WxSbIA4. Redirect URL / ID Token
(POST) https://preprod1.iddataweb.com/axn/oauth2/token
At your redirect URL, you'll exchange the Authorization Code you receive for an ID Token containing the results of the user's session using the /token endpoint (see above).
Request
This is the getJWT() function used in Contents of the ID Token
// Generate a ID Token using the Authorization Code received from Gateway.
const axios = require('axios')

const request = async (auth, authCode) => {
  let response = await axios({
    url: "https://preprod1.iddataweb.com/axn/oauth2/token",
    method: "POST",
    data: {
      grant_type: 'authorization_code',
      code: 'SplxlOBeZQQYbYS6WxSbIA', // obtained from step 3.
      redirect_uri: auth.redirect_uri,
      client_id: auth.apikey,
      client_secret: auth.secret
    },
  headers: {
    accept: 'application/json',
      "Content-Type": "application/x-www-form-urlencoded",
      "Cache-Control": "no-cache",
    },
  }).catch(error => console.log(error))
  console.log(response.data)
  return response.data
}
Response
{
  "id_token": "eyJhbGciOiJSUzI1NiIsImtpZCI6IjFlOWdkazcifQ.ewogImlzc
    yI6ICJodHRwOi8vc2VydmVyLmV4YW1wbGUuY29tIiwKICJzdWIiOiAiMjQ4Mjg5
    NzYxMDAxIiwKICJhdWQiOiAiczZCaGRSa3F0MyIsCiAibm9uY2UiOiAibi0wUzZ
    fV3pBMk1qIiwKICJleHAiOiAxMzExMjgxOTcwLAogImlhdCI6IDEzMTEyODA5Nz
    AKfQ.ggW8hZ1EuVLuxNuuIJKX_V8a_OMXzR0EHR9R6jgdqrOOF4daGU96Sr_P6q
    Jp6IcmD3HP99Obi1PRs-cwh3LO-p146waJ8IhehcwL7F09JdijmBqkvPeB2T9CJ
    NqeGpe-gccMg4vfKjkM8FcGvnzZUN4_KSP0aAp1tOJ1zZwgjxqGByKHiOtX7Tpd
    QyHE5lcMiKPXfEIQILVq0pc_E2DzL7emopWoaoZTF_m0_N0YzFC6g6EJbOEoRoS
    K5hoDalrcvRYLSrQAZZKflyuVCyixEoV9GfNQC3_osjzw2PAithfubEEBLuVVk4
    XUVrWOLrLl0nx7RkKU8NXNHq-rvKMzqg",
  "access_token": "SlAV32hkKG",
  "token_type": "Bearer",
  "expires_in": 3600,
}
Verifying the ID Token's digital signatureIt is highly recommended that the RP verifies the ID Token's digital signature. Please see the next page for more information.
5. Contents of the ID Token
The ID Token can be broken up in to three parts:
- Header
Describes the token's type, and hashing algorithm used.
- Payload
The data from your user's session.
- Signature
A signature from the ID Token's sender, i.e.
ID Data Web.
For a more in-depth look at the ID Token.
To decode the ID Token, you'll need to convert it from its (base64) encoding to text/JSON.
Example
This example comes from an Express.js server, where an Authorization Code is received at an endpoint
/redirect(our redirect URI), and is converted to JSON in the following manner:
app.get("/redirect", async (req,res) => {
  // retrieve the auth code obtained from the redirect.
  let authCode = req.query.code
  // exchange the auth code for the JSON Web Token containing our results.
  let jwt = await getJWT(auth, authCode)
  // split, then grab the payload portion of our jwt.
  let payload = jwt.split(`.`)[1] // output -> [0]header, [1]payload, [2]signature
  // convert the base 64 encoded payload to a JSON string.
  let jsonString = Buffer.from(payload, 'base64').toString().replace(/\/\/\/\//g, '') // removes the slashes that were generated during the payload's encoding.
  // lastly, convert the string to JSON.
  let data = JSON.parse(jsonString)
}
Once decoded, the format of the id_token will be the following:
{
    "at_hash": "udfkrvnPivU4uE0BYeUcXA",
    "sub": "[email protected]",
    "aud": "18976aa43dca4b4e",
    "endpoint": {
      "status": "success",
      "errorCode": "",
      "errorDescription": "",
      "credential": "[email protected]",
      "credentialCreationDate": "02/08/2022 21:09:35 UTC",
      "mbun": "f3f2a548-6c67-4155-8e30-bb1a28c84647",
      "maxToken": "EnMbLwzgyefV3dndx9d5r1C-iEyZ8PpRhuIeIFlGpIE",
      "endpointInstanceList": [
          //details of each step (api key) in verification workflow
        ]
    },
    "policyDecision": "approve",
    "idwRiskScore": "100",
    "iss": "https://preprod1.iddataweb.com/preprod-axn",
    "idwTrustScore": "100",
    "exp": 1644355218,
    "iat": 1644354618,
    "jti": "008ab766-a58d-4489-b4cd-85188d2562d0" // Your Transaction_ID, containing more details about your user's session.
  }
The key attribute in the output is the policyDecision, which indicates how you should proceed with your user - APPROVE (user met your verification policy, proceed to next step), or DENY (user was not verified.) A more detailed look at the ID Token structure can be found here.
Updated 5 months ago
Next, learn how to verify and parse the ID Token to obtain user verification results.
